
Cortex Project History | Portfolios
Work with portfolios
A portfolio is a collection of projects that you save for re-use (bench-marking, analysis, etc.) in the future. A project can belong to multiple portfolios.
How do I?
View my portfolios
Click  and select Portfolios from the menu. The Portfolios page opens on a new browser tab.
The folder pane displays on the left side of the Portfolios page so you can browse your portfolios. The portfolio collection displays on the right side of the Portfolios page based on the folder selected in the folder pane.
To view general portfolio details, click on the General tab. Details included in the General tab include the portfolio name, description, created by, created on (date), modified by, modified on (date), the number of records, and the portfolio type.
Work with the folder pane
- Right-click a folder to access these folder management shortcut options: New folder, Cut, Copy, Paste (available after clicking Cut or Copy), Rename, and Delete.
- Right-click a portfolio to access these shortcut options: Edit, Cut, Copy, Paste (available after clicking Cut or Copy), and Delete.
- To resize the folder pane, select the pane border and drag it.
- To hide the folder pane, click
 . To show the folder pane, click
 on the folder pane border.
- To show only your portfolios in the folder pane, set the My portfolios switch (located at the top of the folder pane) to on.
To browse the portfolios, expand and collapse folders in the folder pane.
To search for a specific portfolio:
- Enter your search keyword(s) in the Search box at the top of the folder pane.
- Click
 (Search) or press ENTER.
You can open a portfolio from the portfolio collection or the folder pane.
- Portfolio collection: Click the portfolio name.
- Folder pane: Select the portfolio
The single portfolio page opens. Click the desired tab to review the portfolio details.
- To see general information about the portfolio, click the General tab.
- To review the statistics for the portfolio attributes, click the Attributes tab.
Cortex calculates the statistics for all the projects in the portfolio and displays them as columns on this tab.
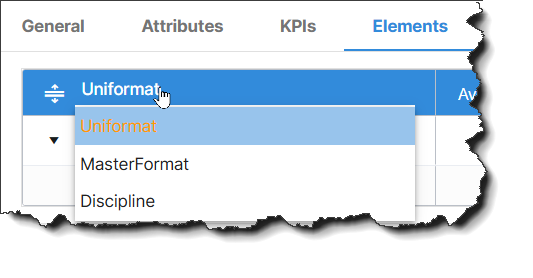
- To review the element statistics for all the projects in the portfolio, click the Elements tab.
You can select different grouping hierarchies (e.g. Uniformat, MasterFormat) from the list above the elements grid:
- To see the projects included in the portfolio, click the Projects tab. Working on the Projects tab is just like working with a project collection. Everything you can do in a project collection, you can do on the Projects tab.
Create a portfolio
- In a project collection (or the Projects tab of an existing portfolio), select the projects you want to save to the portfolio.
- Click the (
 ) Portfolios icon.
- In the Save Portfolio window, enter a name for the portfolio.
- If desired, enter a description of the portfolio.
- Select the folder you want to save the portfolio to.
- If factors are currently being applied, a banner displays at the top of the Save Portfolio window to let you know factors will be saved with the portfolio.
To save a different set of factors with the portfolio or clear the factors:
- Click Manage portfolio factors.
- To save a different set of factors for the portfolio, select the desired rate tables and adjustments, and click Apply. These factors are specific to the portfolio and independent of other factors applied elsewhere in Cortex Project History.
- To clear the factors for the portfolio, click Clear all factors in the Portfolio Factors window.
- To save the portfolio and open it, click Save & open.
Tip
If a baseline project, element, or item is in effect when you create the portfolio, the baseline is maintained in the portfolio.
Edit a portfolio (change the name or description)
- Click
 and select Portfolios from the menu to open the Portfolios page.
- Open the portfolio.
- Click Edit.
- Change the portfolio name and description as needed.
- To save the portfolio to a different folder, select the desired folder from the list.
- Click Save.
Delete a portfolio
In the portfolio collection, select the portfolio's check circle, and click  (Delete). Click Permanently delete to confirm the deletion.
Set a baseline project for a portfolio
- Click
 and select Portfolios from the menu to open the Portfolios page.
- Open the portfolio.
- Click the Projects tab.
- To select the baseline project, click the row circle.
- Click
 . The baseline project moves to the top of the grid and is shaded orange.
- As you scroll through the project rows, the baseline project remains visible at the top
- To remove the baseline project selection, click
 .
- To replace the current baseline project, select the project you want to replace it with and click
 .
Apply factors to a portfolio
- Click
 and select Portfolios from the menu to open the Portfolios page.
- Open the portfolio.
- Click
 to open the Portfolio Factors window.
- Under Rate tables, select the desired factors to apply to the portfolio. For example, select a different state, city, and year from the Location & Date lists.
The switch at the bottom of the Portfolio Factors window controls whether multipliers or percentages display.

How do multipliers work?
Multipliers are base 100. For example, if a factor of 100 is applied, it has no impact—100 is a 0% change. A multiplier of 80 correlates to -20%.
- To apply one or more adjustment factors to the portfolio, enter values (as a multiplier or a percentage based on the setting at the bottom of the Portfolio Factors window) in the boxes under Adjustments.
To see the note for an adjustment, hover over  next to the adjustment name.
To clear an adjustment, click  next to the adjustment box.
- Click Apply to apply the factors.
The factors you applied display in a yellow banner at the top of the single portfolio page. The factored values display in bold.
Remove factors from a portfolio
- Click
 to open the Portfolio Factors window.
- Click Clear all factors at the bottom of the window.
- Click Apply.
Add a project to an existing portfolio
On the single portfolio page, click on the Projects tab.
In the Projects view, click the Add projects icon  located in the title bar (the white area at the top of the Cortex window) to search and select projects.
Remove a project from a portfolio
- Click
 and select Portfolios from the menu to open the Portfolios page.
- Open the portfolio.
- Click the Projects tab.
- Select the check circle of the project you want to remove.
- At the top of the portfolio page, click
 to remove the project from the portfolio.
Compare projects in a portfolio
- On the Projects tab, select the check circle (first column) for each project you want to compare.
To select all the projects in the list, click the check circle located next to the Project name column heading.
- Click
 (Compare).
After clicking  you will be redirected to the Compare page.
- The selected projects display side-by-side in a tabular layout with the project attributes in the first column. If all the projects contain 0 (zero) for a particular attribute, that attribute will not appear in the comparison.
Expand and collapse attribute groups on the Compare page as needed to see the information you need.
Remove projects for comparison in a portfolio
- From the portfolio comparison view, select the check circle (located near the project name) for each project you want to remove from comparison.
- Click
 (Remove) projects at the top left hand side of the page.
- Cortex Project History recalculates your selected portfolio comparisons.
Work with portfolio charts
Working with single portfolio charts is just like working with single project charts.
View KPIs (key performance indicators)
Click the KPIs tab to view the key performance indicators.
- If no KPIs are set up for the project, the KPIs tab is not available.
- If certain details do not contain data, they will be suppressed from view by default. Suppressed details are also excluded from Excel exports and chart options.
- If you have multiple KPI views set up, select the desired view from the list.
Move a portfolio to a different folder
Use one of the following methods to move a portfolio to a different folder:
Cut and Paste
- In the folder pane, right-click the portfolio you want to move and click Cut on the shortcut menu.
- Right-click the folder you want to move the portfolio to and click Paste on the shortcut menu.
Drag and Drop
- In the folder pane, select the portfolio you want to move and use the left mouse button to drag it to the desired folder.
- When the hover tip shows + portfolio name, release the left mouse button to drop it in the folder.
Create a dynamic portfolio with a saved search
What is a dynamic project portfolio?
A dynamic project portfolio updates with projects that meet its criteria (the search keyword(s) or selected browse node and any filters in effect when you created the portfolio) when you import projects.
- Search or browse for the projects you want to include in the portfolio. You must use the search or browse features to create a dynamic portfolio.
- Apply filters to the collection, if desired. Cortex saves the filters with the portfolio
- Click the Settings
 icon and select Save search.
- In the Save Search window, enter a name for the portfolio and select the Save as a portfolio option.
When you view the portfolio collection, the magnifying glass icon () indicates which portfolios are Dynamic. The system refreshes all dynamic portfolios when it detects any changes to project data and the Last refresh date is updated.
Select a baseline portfolio for the portfolio collection
- In the portfolio collection, select the portfolio check circle.
- Click
 . The selected portfolio moves to the top of the collection.
To cancel the baseline portfolio selection, click  .
Change the portfolio collection layout
Select a different view for the collection
- In the portfolio collection title bar, click
 (Settings).
- Select the desired view from the list.
The name of the view currently in effect for the collection displays in the collection title bar.
If you make changes (resize a column, reorder the columns, etc.) to the view while working in the collection, an asterisk displays next to the view name indicating changes were made. Your changes are temporary and persist until you select a different view for the collection.
Modify the view
- Click
 (Settings) located above the grid, and then click Settings to open the Settings page.
- On the Columns tab, the Selected list shows the columns that currently appear in the collection.
- To add a column, drag the desired column from the Available list and drop it in the Selected list. Expand and collapse column groups and use the Search box as needed to locate the desired column in the Available list.
- To remove a column, double-click the desired column in the Selected list. You can also select the column and click
 on the selected column to remove it from the Selected list.
- To change the column order, use drag-and-drop to rearrange the columns in the Selected list.
- Do the following to change visible static rows (these rows help you analyze the totals for the projects. They are gray and appear at the top of the collection.):
- Click the Statistic rows tab located above the Available list.
- Move the desired statistic rows from the Available list to the Selected list to make them visible in the collection.
- When you finish modifying the view, click Save view if you are editing a personal view. If you are editing a shared view, you need to save your changes to a personal view by clicking Save view as and entering a name for the new personal view.
Tip
After you modify the view, your changes persist between your Cortex Project History sessions unless you select a different view or save your changes to a personal view.
Resize columns
Click and drag the divider between columns to resize a column.
Change the column order
Drag the heading of the column you want to move and drop it in the desired position in the column heading row.
Save changes to a view
If you make changes (resize a column, reorder the columns, etc.) to the view while working in the collection, an asterisk displays next to the view name indicating changes were made. Your changes are temporary and persist until you select a different view for the collection.
- To save changes to a personal view, click
 (Settings) in the collection title bar and click Save view.
- When you change a shared view (the administrator manages shared grid views in the Administration module), you can save your changes to a personal grid view. This icon identifies shared grid views in the selection list:

- To save your changes to a personal grid view, click
 (Settings) in the collection title bar, click Save view as, enter a view name, and click Save.
Change the single portfolio page layout
Select a different view
- In the single portfolio page title bar, click
 (Settings).
- Select the desired view from the list.
The name of the view currently in effect for the single portfolio page displays in the page title bar.
If you make changes (resize a column, reorder the columns, etc.) to the view while working on the single portfolio page, an asterisk displays next to the view name indicating changes were made. Your changes are temporary and persist until you select a different view for the page.
Modify the view
- Click
 , and then click Settings to open the Settings page.
- To change the attribute rows, click the Attribute rows tab.
- Drag attributes between the Available list and the Selected list to determine which attribute rows display on the single portfolio page for this view. Expand and collapse attribute groups and use the Search box at the top of the list to help locate specific attributes.
- Drag attributes up or down in the Selected list to determine the order of the rows on the single portfolio page.
- To change the project columns, click the Project columns tab.
- Drag columns between the Available list and the Selected list to determine which project columns display on the single portfolio page for this view. Expand and collapse column groups and use the Search box at the top of the list to help locate specific columns.
- Drag columns up or down in the Selected list to determine the order of the columns on the single portfolio page.
- To change the attribute columns, click the Attribute columns tab.
- Drag attributes between the Available list and the Selected list to determine which attribute columns display on the single portfolio page for this view. Use the Search box at the top of the list to help locate specific attributes.
- Drag attributes up or down in the Selected list to determine the order of the columns on the single portfolio page.
- To change the element columns, click the Element columns tab.
- Drag columns between the Available list and the Selected list to determine which element columns display on the single portfolio page for this view. Use the Search box at the top of the list to help locate specific columns.
- Drag columns up or down in the Selected list to determine the order of the columns on the single portfolio page.
- To change the project statistics, click the Project statistics tab.
- Drag project statistic fields between the Available list and the Selected list to determine which fields display on the single portfolio page for this view. Use the Search box at the top of the list to help locate specific fields.
- Drag project statistic fields up or down in the Selected list to determine the order of the statistic fields on the single portfolio page.
- When you finish modifying the view, click Save view if you are editing a personal view. If you are editing a shared view, you need to save your changes to a personal view by clicking Save view as and entering a name for the new personal view.
Tip
After you modify the view, your changes persist between your Cortex Project History sessions unless you select a different view or save your changes to a personal view.
Resize columns (Attributes, Elements, or Projects tab)
Click and drag the divider between columns to resize a column.
Change the column order (Attributes, Elements, or Projects tab)
Drag the heading of the column you want to move and drop it in the desired position in the column heading row.
Save changes to a view
If you make changes (resize a column, reorder the columns, etc.) to the view while working on the single portfolio page, an asterisk displays next to the view name indicating changes were made. Your changes are temporary and persist until you select a different view for the page.
- To save changes to a personal view, click
 , and then click Save view.
- When you change a shared view (the administrator manages shared grid views in the Administration module), you can save your changes to a personal view. This icon identifies shared views in the selection list:

- To save your changes to a personal view, click
 in the collection title bar, click Save view as, enter a view name, and click Save.
Locking the portfolio will prevent other users from making changes to the budget until you choose to unlock it.
- Highlight the portfolio name you want to lock (left pane portfolio list) and right click to display the drop down menu.
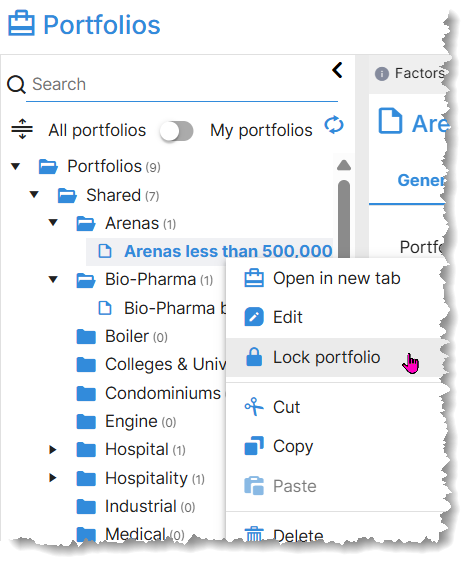
- Click Lock portfolio.
A padlock icon ( ) will display next to the portfolio to indicate when it's locked.

Unlock a portfolio
Unlocking the portfolio will allow other users to make changes to the budget.
- Highlight the portfolio you want to unlock (left pane portfolio list) and right click to display the drop down menu.
- Click Unlock portfolio.
Cortex 365 does not include the portfolios feature.