
Cortex Budget Builder | Single Budget Page
Work with the single budget page
On the single budget page, you can review or edit general information about the budget, budget attributes, and cost details (elements).
How do I?
Program budgets, budgets, and subbudgets
Show/Hide Subbudgets
If there are subbudgets related to a Program budget, you can use the Subprojects switch (located above the grid) to show or hide the subprojects. The subbudgets switch only appears if there are subbudgets currently assigned to that budget.

To include all displayed subbudgets in the charts and grid analyses, click the Select all subbudgets icon  at the top of the page located in the title bar (the white area at the top of the Cortex window). Select or clear the selection circle of the subbudget column to include or exclude that specific subbudget from the analyses.
To change the column or row order of the subbudgets, use drag-and-drop to rearrange the columns or rows in the Selected list.
Add a subbudget
- Click Edit at the top of the page in the title bar to open the budget edit page.
- Click the
 (Add Budgets) icon at the top of the page in the title bar, then click Subbudgets.
- Enter the name of a budget to Search in the search field and select Add at the bottom right of the window.
- Click Save then Close (located in the title bar).
Remove a subbudget
- Click Edit at the top of the page in the title bar to open the budget edit page.
- Click the selection circle at the top of the subbudget column you want to remove.
- Click the
 (Remove budgets) icon.
- Click Save then Close.
View general budget information
Click the General tab to review general information about a budget or subbudget.
View the budget attributes
Click the Attributes tab to review the budget attributes organized by group.
Expand and collapse groups as needed. To collapse all the groups, click  . To expand all the groups, click
 .
View the budget elements
Click the Elements tab.
You can expand and collapse element groups as needed.
- To collapse all the groups, click
 .
- To expand all the groups, click
 .
Create a budget iteration
As you work on a budget, if you don't want to overwrite the current budget with the changes, you can click Save as instead of Save. Saving the budget using a different name is a quick, easy way to create a budget iteration.
Show/Hide the Markups grid view
You can show the markups grid view by clicking the blue show/hide icon  at the top of the page.
You can hide the markups grid view by clicking the orange show/hide icon  at the top of the page
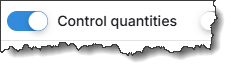
Show/Hide the Control quantities on the single budget page
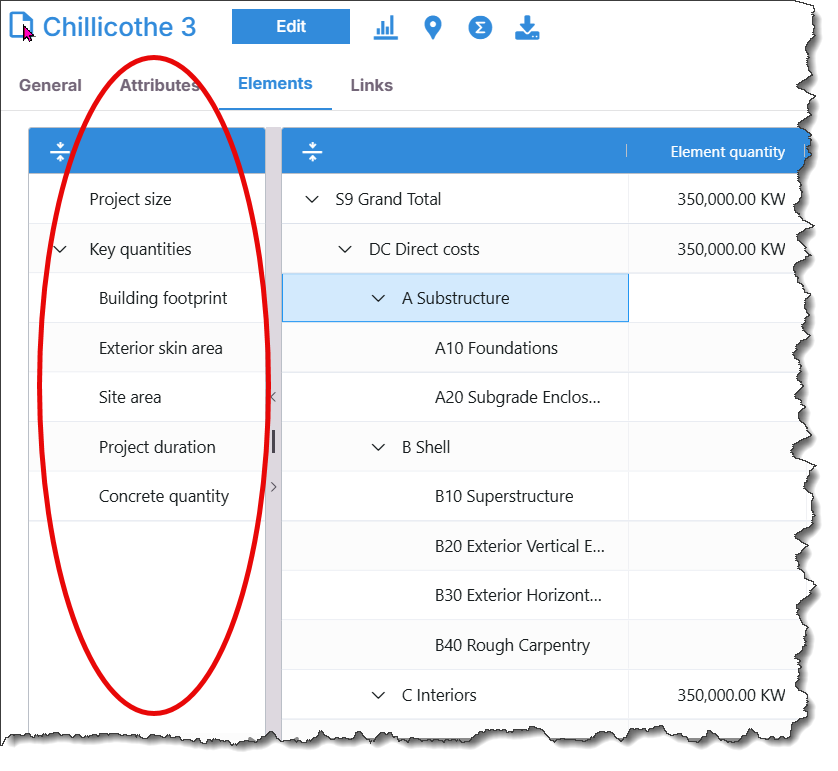
Slide the Control quantities switch (located center page, above the grid) to show or hide the "quantity type description" column (far left of the grid view).
Show/hide statistics on the single budget page
You can show or hide statistics for the reference projects used to create the budget
- To show reference project statistics on the Element tab, move the Statistics switch (located in the top right corner of the page) to the on position. The statistics display in columns to the right of the budget column.

- To hide the reference project statistics, move the Statistics switch to the off position.
Replace an element in the budget
Replace an element with a statistic on the single budget page
You can replace an element with a statistic on the Elements tab.
- To use a statistic for an element on the Element tab, click on the
 (Settings) icon in the top right corner of the page and select Settings.
- Click in the Available column header to expand all options, then double click any of the percentages available to use as a statistic. Double clicking a statistic will move the option to the Selected column.
- Click Save at the top of the page when finished to save your selection.
Show/hide reference projects on the single budget page
You can show or hide data for the reference projects used to create the budget.
- To show reference project data on the Attributes and Element tabs, move the Reference projects switch (located in the top right corner of the page) to the on position. The reference projects display in columns to the right of the budget column.
- To hide the reference project data, move the Reference projects switch to the off position.

Add a reference project on the single budget page
You can add Reference projects to the single budget for comparison.
- On the single budget page, move your reference projects slider (located above the grid view) to On, if it isn't already.
- Click
 (Add) in the title bar of the single budget and select Add Projects.
- If you have budget values linked to statistics, you will see a pop up warning alerting you that the statistics will recalculate and your budget values will update accordingly. You can choose to cancel the addition if you do not intend to have statistic values changed or continue by selecting OK.
- After selecting OK, a Search window for projects will open. Enter the exact project name or a project type (e.g., Office) to search.
- Select which project or projects you would like to add by checking the selection circle next to the project name. If you would like to filter your results, use the filter attributes located in the left search pane. Once selected, click Add projects in the bottom-right of the window.
Show/hide indicators on the single budget page
You can show/hide indicators on the single budget page without changing the current indicator options in Settings by moving the Indicators switch (located in the top right corner of the page) to the on or off position.

- On the single budget page, click
 (Settings) in the top right corner of the page.
- Click Indicators in the list.
- Select the indicators you want to show on the single budget page. The selected indicators appear on all the single budget page tabs: General, Attributes, and Elements.
- Element quantity lookup links: Show which element quantities are linked to other fields.
- Reference data sources
- Locked elements
- Outliers: (Indicate where your budget or reference data varies from the average or median by a certain percentage or standard deviation based on the outlier type you select.) Outlier indicators can display on the Attributes or Elements single budget page tab.
- Specify the outlier type (percentage or standard deviation) on the Outliers tab. For Percentage outliers, specify the Statistic basis (Average or Median) to use and the threshold percentages for the First and Second thresholds. The outlier arrow points up or down to indicate how it compares to the specified outlier type.
- Last entered value: When you enter a value on the Elements tab, the value appears in bold to indicate it was edited manually. Note that Cortex removes the bolding if another change causes the manually entered value to be calculated by the system.
- Clear the indicators you do not want shown on the single budget page.
- Your selections apply to all your budgets and persist between Cortex Budget Builder sessions.
- Click Apply.
Change the visible attributes (Attributes tab)
- On the single budget page, click the Attributes tab.
- Click
 (Settings), and then click Settings in the list.
- On the Fields tab, the Selected list shows the attribute fields that currently appear on the single budget page. Modify the selected fields, as needed.
- To add a field, double-click the desired field in the Available list to move it to the Selected list. Expand and collapse field groups and use the Search box as needed to locate the desired field in the Available list.
- To expand all the field groups in the Available list, click
 . To collapse all the field groups, click
 .
- To remove a field, double-click it in the Selected list (or select it and click
 on the attribute) to move it to the Available list.
- To change the field order on the single budget page, use drag-and-drop to rearrange the fields in the Selected list.
- Click Save.
Change the visible budget or reference data columns (on the Elements tab)
- On the single budget page, click the Elements tab.
- Click
 (Settings), and then click Settings in the list. When showing reference data, multiple tabs are available on the Settings page. Otherwise, only the Columns tab is available.
- To change the visible budget columns, click the Budget columns or Columns tab, based on whether you are showing reference data. The Selected list shows the budget columns that currently appear on the Elements tab. Modify the selected columns, as needed.
- To add a column, double-click the desired column in the Available list to move it to the Selected list. You can compare up to five columns when showing reference data.
- To remove a column, double-click it in the Selected list (or select it and click
 on the attribute) to move it to the Available list.
- To change the column order, use drag-and-drop to rearrange the columns in the Selected list.
- To change the visible reference data columns, click the Reference data columns tab (as the name implies, this tab is available only when showing reference data on the single budget page). Modify the selected reference data columns, as needed.
- Click Save.
- To set the view settings back to default, Click (Settings), then select
 (Default).
Change the visible statistic columns (when showing reference data)
- On the single budget page, click the Attributes or the Elements tab.
- Click
 (Settings), and then click Settings in the list.
- Click the Statistic columns tab.
Several statistic columns (Average, High, Baseline to median, Median, Spread, Low, and more) are available to help you analyze the totals.
Double-click the desired columns in the Available list to move them to the Selected list. To remove a statistic column from the single budget page, double-click it in the Selected list to move it to the Available list.
- To change the order of the statistic columns, use drag-and-drop to rearrange the columns in the Selected list.
- Click Save.
Note. As you make changes on the single budget page, the statistics update in real-time on the Attributes and Elements tabs when showing reference data.
Open a reference project from the single budget page
On the single budget page, click the reference project name to open the reference project in a new browser tab.
Manually select reference data for the budget
You can manually select reference project values or statistics to use in a budget.
Select a reference project value
- On the single budget page, make sure the reference data is showing.
- Click Edit.
- On the Attributes or Elements tab, right-click the project value you want to use in the budget and click Select for budget (this command is not available on the shortcut menu if the budget unit and reference project unit do not match) on the shortcut menu.
- If the selected value is a quantity, the Quantity Selection window opens. To scale the quantity based on the difference between the project size of the reference project and the project size of your budget, click Yes, scale. Otherwise, click Don't scale to use the quantity as is in the budget.
Cortex applies a reference link indicator to both values so you can see at a glance that the values are linked. It also applies a hover tip to the value so you can see where it originated from and whether it was scaled.
Select a reference statistic value
- On the single budget page, make sure the reference data is showing.
- Click Edit.
- On the Attributes or Elements tab, right-click the statistic value you want to use in the budget and clickSelect for budget(this command is not available on the shortcut menu if the budget unit and reference project unit do not match) on the shortcut menu.
- If the selected value is a quantity, the Quantity Selection window opens. To scale the quantity based on the difference between the statistic's project size (e.g., Average project size, Median project size, High project size) and the project size of your budget, click Yes, scale. Otherwise, click Don't scale to use the quantity as is in the budget.
Cortex applies a reference link indicator to both values so you can see at a glance that the values are linked. It also applies a hover tip to the value so you can see where it originated from and whether it was scaled.
Exclude specific reference project data from the statistics
You can select specific reference project values and exclude them from the statistics, as needed. This is helpful if those values are an outlier or don't apply to your budget.
Exclude individual reference project data values (Attributes tab)
- On the single budget page, make sure the reference data is showing.
- Click Edit.
- On the Attributes tab, right-click the reference project value you want to exclude and click Exclude from reference data on the shortcut menu.
The excluded value displays in light gray with a line through it (strikethrough) to indicate it is excluded. Cortex recalculates the statistics and any linked budget amounts to reflect the excluded value.
Exclude individual reference project elements (Elements tab)
- On the single budget page, make sure the reference data is showing.
- Click Edit.
- On the Elements tab, right-click the reference project value you want to exclude and click Exclude from reference data on the shortcut menu.
The excluded value displays in light gray with a line through it (strikethrough) to indicate it is excluded. Cortex recalculates the statistics and any linked budget amounts to reflect the excluded value.
What happens if I exclude a parent row value?
When you exclude a value on a parent row, all the child values in that column are also excluded. The parent and child values display in light gray with a line through them.
Include reference project values or elements that were previously excluded
- On the single budget page, make sure the reference data is showing.
- Click Edit.
- On the Attributes or Elements tab, right-click the excluded value and click Include in reference data on the shortcut menu.
Cortex recalculates the statistics and any linked budget amounts to reflect the include value.
Lock element rows (to prevent changes)
You can prevent changes to specific element rows on the single budget page by locking them. This is helpful when you have your element costs exactly the way you want them and no additional changes are needed.
- On the single budget page, click the Elements tab.
- Right-click the row you want to lock and click Lock row on the shortcut menu.
If you are showing locked element indicators, a lock icon ( ) appears next to the element Description letting you know at a glance that the element is locked.
To unlock a row, right-click it and click Unlock row on the shortcut menu.
What happens when you lock a parent row?
If you lock a row that has subordinate rows (a parent row), Cortex also locks all the subordinate rows (child rows). For example, if you lock A Substructure, Cortex locks A10 Foundations and A20 Subgrade Enclosures.
Similarly, if you lock all the child rows, Cortex also locks the parent row. For example, if you lock A10 Foundations and A20 Subgrade Enclosures, Cortex locks the parent row, A Substructure.
How do locked elements affect calculations?
When an element is locked, these are the only fields that can change based on changes made to parent rows or changes made to the Project size on the General tab:
- % of Budget total
- % of Element total
- Element total / Project size
If a parent row's Element total changes and it has locked and unlocked child elements, Cortex uses the following formula to prorate the change across the unlocked child elements:
(( [Unlocked element total] / [Total of all unlocked elements] ) * [Net change to parent] ) + [Unlocked element total]
Locking the budget will prevent other users from making changes until you choose to unlock it.
- Highlight the budget name you want to lock (left pane) and right click to display the drop down menu
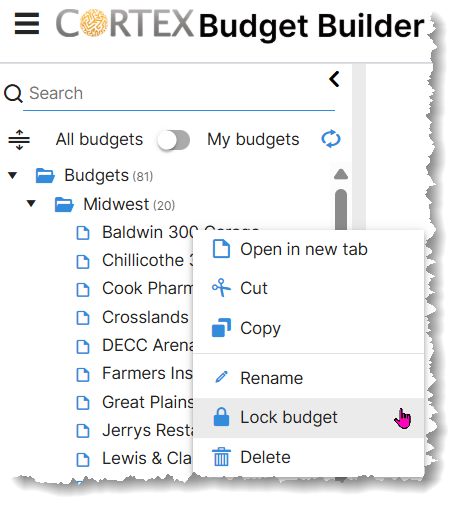
- Click Lock budget.
A padlock icon ( ) will display next to the budget name to indicate when it's locked.

Unlock a budget
Unlocking the budget will allow other users to make changes to the budget.
- Highlight the budget you want to unlock and right click to display the drop down menu.
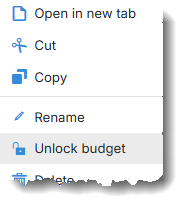
- Click Unlock budget.
Manage linked element quantity indicators
You can see which element quantities are linked to other fields by showing linked element quantity indicators on the single budget page. By default, linked element quantity indicators are not visible on the single budget page.
Show/hide linked element quantity indicators on the single budget page
- On the single budget page, click the Elements tab.
- Click
 (Settings) in the top right corner of the page.
- Click Indicators in the list.
- To show the indicators (
 ) on the single budget page, select the Element quantity lookup links option.
To hide the indicators, clear the Element quantity lookup links option.
Your selection applies to all your budgets and persists between Cortex Budget Builder sessions.
- Click Apply.
Change (overwrite) a linked element quantity
- On the single budget page, click Edit.
- Click the Elements tab.
- Expand the grid to the element level.
- Enter the desired quantity for the element in the Element quantity column.
When you enter an element quantity, Cortex changes the quantity for the linked attribute to match. Cortex keeps the linked quantities in sync.