
Cortex Budget Builder | Replace an Element in a Budget
Replace an element in the budget
Why would I want to do this?
You might want to replace an element in the budget with an element from a project in Project History because that element is more similar (appropriate) than any of the selected reference data projects.
Perform the following procedure to replace an element in the budget with an element from Project History.
Note. You can replace an element only if it is unlocked and all of its children (subordinate elements) are also unlocked.
- Open the budget for editing, if it is not already open.
In the folder pane or budget collection, click the name of the budget you want to edit and click Edit in the budget title bar. The budget icon (  ), next to the budget name, is replaced with an orange pencil icon (
 ) to indicate you're in edit mode.
- After selecting Edit, click the Elements tab, then right-click the element you want to replace and click Replace element: [Num]. Cortex searches Project History for the element ID and returns a list of elements you might want to use in the current budget.
- Review the search results.
- You can select different columns and statics to view by clicking on
 (Settings) in the top-right corner of the grid.
- You can view the information that will help you choose a replacement element. To open the element in a separate browser tab, click the ID.Description link.
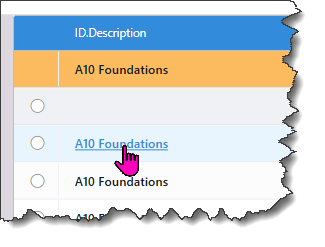
You can narrow the search results as needed using the Element and Project filters.
On the Element filters tab, filter the search results by element similarity score, quantity, element direct cost, element unit cost, and/or the element total. If a unit is set for the Element quantity field, the search results automatically show only elements that have the same unit. (You can clear the unit filter, if desired.)
On the Project filters tab (located under the Element Filters tab), filter the search results to see only elements that belong to projects with the values you specify for certain project attributes.
- Select the check circle of the desired element and click Select.
If you are replacing a parent element, such as A Substructure or B Shell, select the desired options in the Replace Element Options window.
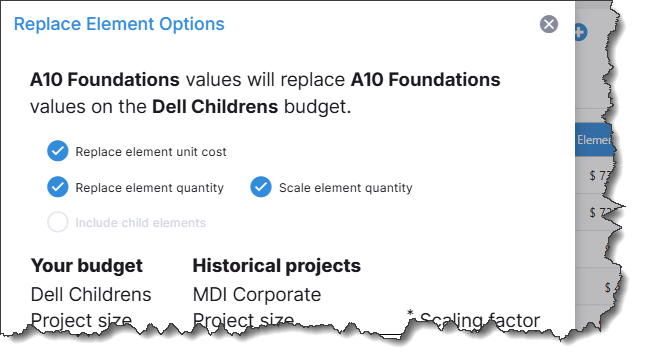
- Replace element unit cost: To replace the element unit cost, select this option. Otherwise, clear it.
- Replace element quantity: To replace the element quantity, select this option. When you select this option, Cortex shows how the scaling factor is calculated below the replacement options: Your budget / Historical project = Scaling factor
- Scale element quantities: This option is available if you choose to replace the element quantity. If applicable, the scaling factor displays in the Replace Element Options window. To scale the element quantities for this element based on the difference between the budget's project size and the replacement element project's size, select this option. Otherwise, clear this option if you do not want to scale the element quantities.
- Include child elements: To include all the child elements, select this option. Otherwise, clear this option to include only the parent element.
The New budget element row in the Change summary table shows the resulting element quantity, element unit cost, and element direct cost after replacing the element.
- Click OK to populate the budget with the selected replacement element. Note that Cortex removed any element quantity lookup links for this element that existed before you replaced it. Cortex also applied any factors that were saved with the budget.
Cortex displays a dashed blue underline under the element unit cost, element quantity, or both based on what you chose to replace.
A broken link ( ) appears to the left of the Element quantity indicating that the element quantity was previously linked to a field value, such as Building footprint or Exterior Skin Area, and is now broken as a result of replacing the element. To relink the element quantity to the field, right-click the element row and click Relink to field name on the shortcut menu.