
Cortex | Administration | Project Fields
Manage the project fields list (Administration)
 Only users who are set up as administrators in Cortex have access to this feature.
The project field list contains all the project fields in Cortex. For each field, you can specify which group the field belongs to, along with the field name, type (Text, Quantity, Currency, Check box, Ratio, Simple ratio, etc.), expression (a formula that uses basic math operators and built-in functions to calculate the field value) (for certain field types only), unit, and number of decimal places.
What are system fields?
Cortex comes with fields called system fields in addition to the ones you configure for your company. You can rename system fields, but you can't delete them because they are needed within Cortex. The System column indicates which project fields are system fields.
To see the original name of a system field and a description of the field's purpose, click  in the System column next to Yes.
What is the Cortex ID field?
Cortex assigns a unique ID to each project called the Cortex ID. You can rename this field, but you can't delete it.
How many project fields do I have?
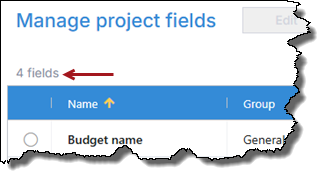
The field count displays above the grid. The field count works with the filter feature. If you want to know how many fields of a particular type you have, you can filter the list by the Type column and look at the field count.
How do I?
Open the Administration module
Click  and select Administration from the menu. The Administration module opens in a new browser tab.
Add project fields
- In the Administration module options list, select Fields > Project fields > Fields.
- Click Add to open the Add Project Field window.
- Enter a name for the field in the Name box.
- From the Group list, select the group you want to assign the field to.
- For fields containing project notes that you want to appear at the top of the single project page when viewing project attributes, select the Project notes - header group. (These project notes display just below the project summary and span the width of the single project page.)
- For fields containing project notes that you want to appear at the bottom of the single project page when viewing project attributes, select the Project notes - footer group. (These project notes display just below the attributes and span the width of the single project page.)
- From the Type list, select the applicable field type.
When should I use the Number versus the Quantity field type?
- Use the Number type when the field just contains a number, such as a revision number, part number or in-service year, and the unit is implied (miles to site, number of desks, and so on).
- Use the Quantity type when you want to assign a default unit to the field, but the unit could vary (e.g., Concrete volume is usually CY, but for jobs in Mexico it’s M3) or you want the value converted to metric and/or factored (e.g., productivity factors applied to labor hours, or waste factors applied to material quantities).
When should I use the Text versus the Memo field type?
- Use the Text type for most of your text fields. This field type supports up to 250 characters.
- Use the Memo type for large text fields, like project summaries, assumptions, or clarifications, that require more than 250 characters. This field type supports up to 400 characters, by default. Note that the Memo type supports rich text formatting.
- Select the desired field options (options vary based on the selected field type):
- Calculated: If you select one of the following field types, you can use an expression (a formula that uses basic math operators and built-in functions) to calculate the field: Currency, Number, Quantity, Percentage, Ratio, Text. To add or edit an expression for the field, select the Calculated option and see Add or edit expressions for fields for details.
A lock symbol ( ) next to the Value expression box indicates the expression is locked and cannot be edited because it is a system expression or a custom expression developed for your company.
- Required: To make this field required, select the Required option. Otherwise, clear this option. (This option is not available if you select the Calculated check box.) Cortex ensures that any fields you make required are automatically added to all your project import templates. Required fields are identified with a red asterisk (*) in the project import templates and cannot be removed from the Selected column in the templates.
- Available in charts: This option is available for the following field types: Currency, Number, Percentage, Quantity, Ratio, Simple ratio. To make this field available in charts when at least one of the selected projects has a value, select this option. Otherwise, clear it.
- Suppress if zero: This option is available for the following field types: Cost, Currency, Number, Percentage, Quantity, Ratio, Simple ratio. To hide this field if its value is zero, select this option. Otherwise, clear it.
- Add list values for list and multi-select list fields.
How do I add list values?
To add list values one at a time
- Click Add next to List values.
- In the New list value box, enter the value and press ENTER (or click Add again). You're ready to enter the next list value.
- After you enter the last list value, click Add to display the list of values you entered.
- To change the order of the list values, select the value you want to move and drag it to the desired position in the list.
- To edit a value, select it and click Edit.
- To delete a value from the list, select it and click Delete.
To add list values en masse
Important. This procedure replaces all the existing list values for the field.
- Click Export in the Add Project Field window to download an Excel list values workbook.
- Enter the list values in the Excel workbook.
- Save the Excel workbook.
- Click Import in the Add Project Field window and select the Excel workbook to populate the List values box.
- Select a format for the field, if prompted. (Some field types, such as Currency, Date, and others, provide a format option.)
- For Ratio and Simple ratio field types: To show the currency symbol before the currency value in the numerator of ratio fields, select the Show symbol with currency numerator check box.
Example
Suppose you have a unit cost field that is defined as the Project total divided by the Project GSF. If you select the Show symbol with currency numerator check box, the value will be formatted as $9,999/GSF. If you do not select this check box, the value will be formatted as 9,999 $/GSF.
- Set defaults for the field, if desired.
- Default column width: Change the default column width for the field, if desired. This setting controls the width of the column in a grid.
- Initial value: Set an initial value to use for the field, if desired. For Quantity fields, you can also specify the Initial unit.
How do initial values work?
Administrators can specify initial values (and units for Quantity fields) to provide users with the suggested value and/or unit to use for this field on new projects and budgets. For example, if most of your company's projects are substations, you could enter Substations as the Initial value for the Project type field.
When you download a new project import template, initial values and units populate the applicable fields on the Project and Item sheets in the template.
Initial values appear for any fields that are visible when users create a new budget and the first time users add new fields to a budget. Users can change or clear initial field values for the budget.
Can I add units on-the-fly?
If the unit you want is not available in the unit list, enter it and Cortex will automatically add it to the Unit list in Administration. In the Unit list, Cortex adds Initial unit for field name to the unit name so you know that the unit was created on-the-fly when adding fields.
- Value if blank: Set a value to use for the field if it is blank, if desired.
How does this setting work?
The Value if blank setting is available for all field types except Ratio and Date fields that are not calculated. This is useful for fields that typically have the same value; for example, fields used in element hierarchies. The values you enter for this setting populate the non-project specific import template when you download it. After downloading an import template, content managers can change these values, if desired.
If you specify a Value if blank value for a field, users cannot save the project or budget unless this field contains a value. (If the user doesn't enter a value in a field that has a Value if blank value specified in Administration, the system inserts this value when the user saves the project or budget so the field will not be empty.)
- Unit if blank: (Quantity and Ratio fields only.) Enter a unit for the field, if desired. The units you enter for this setting populate the non-project specific import template when you download it. After downloading an import template, content managers can change these units, if desired. For Ratio and Quantity fields that are calculated, this unit is controlled by the Unit expression.
Can I add units on-the-fly?
If the unit you want is not available in the unit list, enter it and Cortex will automatically add it to the Unit list in Administration. In the Unit list, Cortex adds Unit if blank for field name to the unit name so you know that the unit was created on-the-fly when adding fields.
- For Simple ratio fields only: To set up the ratio, select a project field for the Numerator from the list and a project field for the Denominator from the list.
- In the Available in list, select the modules you want the field to be available in: Budget Builder, Project History, or Budget Builder and Project History.
If you mark the field Required and you select Budget Builder & Project History in the Available in list, the Required in option becomes available. In the Required in list, select the modules you want the field to be required in: Budget Builder, Project History, or Budget Builder and Project History.
- Click Save.
Edit project fields
- In the Administration module, select Fields > Project fields > Fields in the options list.
- Select the check box of the field you want to edit and click Edit.
- In the Edit Project Field window, change the field information as desired.
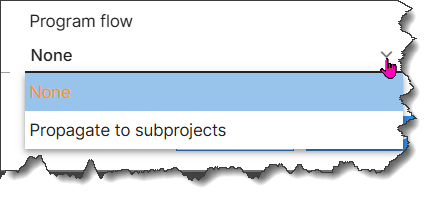
- To apply these values to both a Program and it's subprojects equally, change the Program flow setting from None to Propagate to subprojects.
Delete project fields
- In the Administration module, select Fields > Project fields > Fields in the options list.
- Select the check box of the field you want to delete, click Delete, and confirm the deletion of the field.
Filter the field grid by a specific column
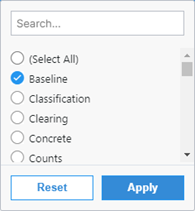
You can filter the field grid by a specific column to work with a subset of the project fields. For example, suppose you want to focus on building out the fields for a specific field group, such as Baseline. You can filter the field grid by the Group column to show only the fields in the Baseline group.
- In the Administration module, select Fields > Project fields > Fields in the options list.
- To filter the field grid by a specific column, click
 in the column heading.
- Select the column value(s) to filter the field grid by and click Apply at the bottom of the value list.
- To see only the system fields (Cortex comes with fields called system fields in addition to the ones you configure for your company. You can rename system fields, but you can't delete them because they are needed within Cortex.) in the field list, select the System check box.
- To clear the filters for the field grid, click
 in the column heading and click Reset at the bottom of the value list.
Sort the field grid by a column
Click the heading of the column you want to sort by. To switch between sorting in ascending and descending order, click the heading again.
Search the field list
You can search for fields by entering some or all of the field name.
- Click in the Name column heading.
- In the Search box, enter some or all of the field name and click Apply to see the list of fields that match your entry.
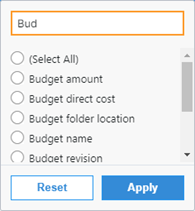
The default search option is Contain, which returns a list of the fields that contain the keyword(s) you entered. For example, enter concrete to see a list of fields that have concrete in their name.
Other search options
You can choose from the following search options, in addition to Contain:
- Do not contain
- Start with
- Do not start with
- Are equal to
- Are not equal to
- End with
Export field list to Excel
To export your field list to Excel, click the  (Download) icon located at the top of the page. The download begins immediately and saves to a predetermined folder location.
While Cortex Project History allows you to add an unlimited number of project fields, Cortex 365 limits the number of project fields you can add. To see the number of project fields allowed and how many have been created, look at the top of the field list.
The Calculated field option is not available for project fields in Cortex 365.