
Cortex Project History | Factors
Apply Factors
You can apply factors (adjust your costs for factors such as location and date, productivity, and complexity, as well as custom factors. Typically, your IT department sets up custom factors.) to projects, elements, and items.
How do I?
- You can apply factors from:
- a project collection
- an element collection
- an item collection
- the single project page
- the Compare projects page
- the dashboard
Important. Applying factors from these collections and pages in Cortex Project History applies them globally with the exception of budgets and portfolios. You apply factors to individual budgets in Cortex Budget Builder and to individual portfolios in the Portfolios module.
- Click
 in the top right corner of the application to open the Apply Factors window.
- Under Rate tables, select the factors you want to apply. For example, select a different state, city, and year from the Location & Date lists.
The switch at the bottom of the Apply Factors window controls whether multipliers or percentages display.

How do multipliers work?
Multipliers are base 100. For example, if a factor of 100 is applied, it has no impact—100 is a 0% change. A multiplier of 80 correlates to -20%.
When you launch the Apply Factors feature from the single project page or Compare projects page, the multipliers or percentages display on the right side of the window so you can see what will be applied to the project(s). This is a preview of the factors. Cortex Project History doesn't apply the factors at this point. Note that the overall factor at the top of the list.
The factors preview does not appear in the Apply Factors window when you launch it from a project, element, or item collection.
What is the overall factor and how is it calculated?
The overall factor tells you how much a project's total cost will change when multiple factors are applied. It highlights the difference between the factored vs. the non-factored project total. The overall factor takes into account the selected rate tables and adjustments you specify.
Individual factors don't reflect the impact of all the factors. For example, a productivity factor might target labor cost only. In this situation, a 2x factor on labor would have $0 net impact to a project consisting solely of non-labor/subcontract costs.
Example 1
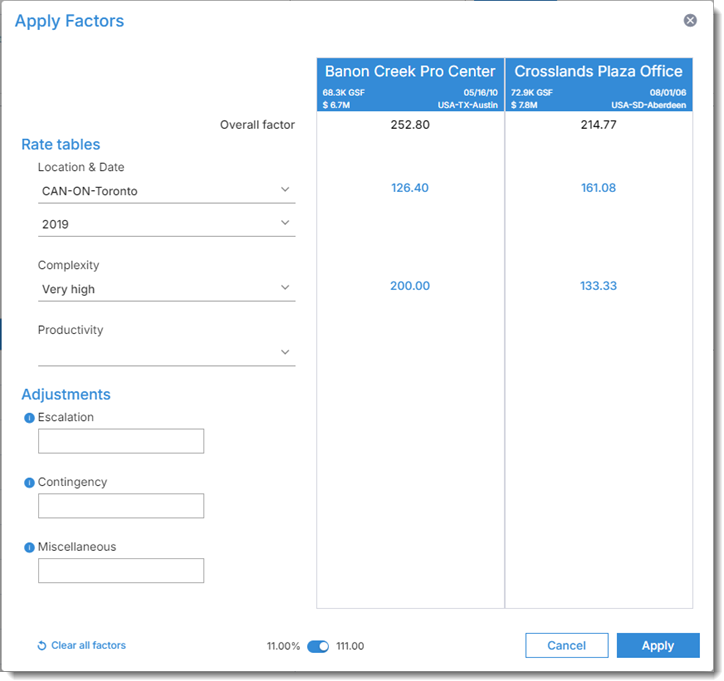
The following example shows two factors being applied. One factor adjusts for the location and date and the other factor adjusts for complexity. Both factors target the total project cost. When all the selected factors target the total project cost, calculating the overall factor is simple:
(Factor 1/100) x (Factor 2/100) x (Factor n/100) = overall factor (multiplied by 100 for display purposes)
or (x/100 * y/100 * n/100) * 100 = overall factor
Example 2
The following example shows the same two factors being applied plus a third factor to adjust for labor productivity. The Productivity factor targets only the labor costs in the projects, so even though the multiplier is the same for Banon Creek and Crosslands Plaza, the overall impact is different assuming they have different labor cost in proportion to total cost.
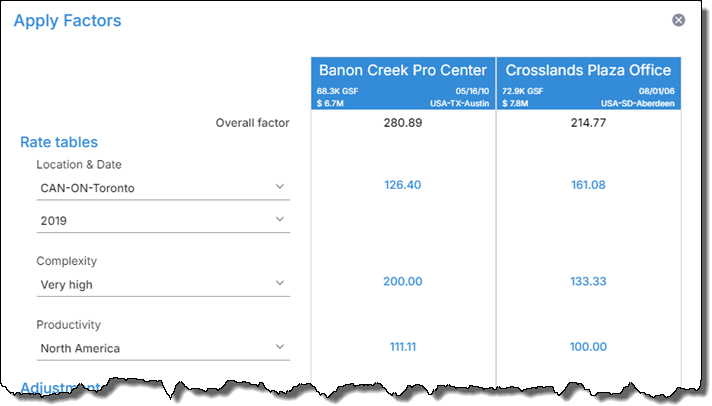
For example, let's say Banon Creek's total cost is $100,000, and out of that, $40,000 is labor. Project History applies only the Location & Date and Complexity factors to the non-labor portion of the total cost. It applies all three factors to the labor portion.
Banon Creek Non-labor: 2.00 x 1.2931 = 2.5862
2.5872 x $60,000 = $155,172
Banon Creek Labor: 2.00 x 1.43 x 1.2931 = 3.698266
3.698266 x $40,000 = $147,931
The original total project cost was $100,000, so the overall factor is 3.03103 (displayed as 303.10).
What does it mean when I see "N/A" or "Multiple rates" in the Apply Factors window?
Your administrator set up rate tables to normalize (adjust) your historical project costs for various factors. These are associated with the lists under Rate tables in the Apply Factors window.
When the system can’t find a match to any of the list values in the rate table, then it can't retrieve a multiplier and *N/A displays next to the rate table in the Apply Factors window. For example, if you are applying a rate table based on Project complexity, and a particular project doesn't have a value for Project complexity, the rate table is not applicable for that project. The same thing happens when a project has a value for a field that does not exist in the rate table. For example, if the possible values for Project complexity in the rate table are Simple, Moderate, and Difficult, but the project’s value is Not complex.
The administrator can also set up rate tables to look at item information and apply rates specifically to different items based on the properties of the item. Because there are typically many items on a single project, multiple rates can be applied with one item-based rate table. In these cases, the system displays Multiple rates in the Apply Factors window. If an item-based rate table is two-dimensional and one of the dimensions is at the project level, it is potentially non-applicable and *N/A may display if the system can’t find a match for the project-level dimension.
- To apply one or more adjustments, enter values (as a multiplier or a percentage based on the setting at the bottom of the Apply Factors window) in the boxes under Adjustments.
To see the note for an adjustment, hover over  next to the adjustment name.
To clear an adjustment, click  next to the adjustment box.
- Click Apply to apply the factors.
The factors you applied display in a yellow banner and the factored values display throughout Cortex Project History. Amounts directly impacted by factoring or recalculated because of the applied factors appear in bold.
Remove factors
Click Remove factors in the yellow banner.
Project History removes the factors from the projects, but it preserves the most recent factor settings in the Apply Factors window so you won't have to select them again the next time you want to apply factors.
Tip
 Only users who are set up as administrators in Cortex have access to this feature.
Administrators can include factor fields in various view types (single project page, project collection, and more) so users can see how project or budget data is being affected by applied factors.
View rate tables
To view a rate table from the Apply Factors window, click the factor associated with the rate table. The rate table opens in read-only mode so you can see the rates.
Learn about currency exchange rate tables
As you import projects into Cortex Project History, you need to configure the currency exchange rate tables for each project. Your company determines the desired granularity for the rates (monthly, quarterly, yearly, etc.) in the currency exchange rate tables. Cortex Project History pulls the rates your company uses for historical base rates (e.g., Forex) from your company’s currency exchange rate table into the project-specific currency exchange rate tables.
Let’s say you published a project at the end of 2011 that you are importing into Cortex Project History. The system locates the 12/31/11 row in your company’s currency exchange rate table and asks whether you want to use those rates. You can confirm those rates and Cortex Project History imports them into the project’s currency exchange rate table, or you can override them because you negotiated special rates for the project. For example, you can override the default 2011 rates by entering the negotiated rates for the project.
To view a project's conversion rates
- From the single project page, click
 located in the top right corner of the page.
- In the Apply Factors window, select a different currency from the Currency list. A link appears to the right of the list.
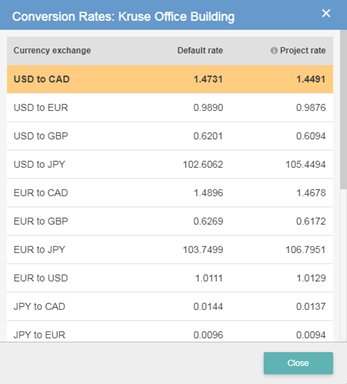
- Click the conversion rates link to open the conversion rates table.
- You can see the default rates from your company’s currency exchange rate table (Default rate column) and any project-specific rates that were entered when the project was published (Project rate column).
- When project-specific rates are entered, they override the default rates.
Convert the unit system or currencies
Use the conversion settings to convert the unit system or currencies and normalize the data for all the projects in Cortex Project History. You can see the converted values on the Single Project page and the Compare projects page.
How do I?
Convert the unit system
- On the actions bar, click
 in the top right corner of the application to open the Apply Factors window.
- Under Units, select the desired system: Native (the unit system originally used for the project), Imperial, or Metric.
- Click Apply. Cortex Project History normalizes the project data to use the specified unit system. A message appears under the title bar.
Convert currencies
- On the actions bar, click
 in the top right corner of the application to open the Apply Factors window.
- Under Currency, select the desired currency from the list.
- Click Apply. Cortex Project History normalizes the project data to use the specified currency. A message appears under the title bar.
View the project conversion rates
Remove the unit system and currency conversions from all projects
Click Remove factors located just below the title bar. Cortex Project History restores all projects to their native unit systems and currencies.