
Cortex | Administration | Rate Tables
Manage rate tables (Administration)
 Only users who are set up as administrators in Cortex have access to this feature.
How do I?
Open the Administration module
Click  and select Administration from the menu. The Administration module opens in a new browser tab.
View my rate tables
In the Administration module, click Factors > Rate tables in the options list.
Each rate table dimension is associated with a project field that Cortex Project History looks at to determine how to pull rates. You need to ensure that any fields you want to associate with dimensions are set up in Fields > Project fields > Fields.
Note that you can't associate dimensions with multi-select list or check circle fields .
How do I set up project fields?
- Set up the dimensions for the rate table.
- Add the rate table.
- In the Administration module, click Factors > Rate tables in the options list.
- Click Add to open the rate table page.
- In the Table name box, enter a descriptive name for the rate table.
- On the General tab, enter the following information for the rate table.
- From the Table rows list, select the dimension to use for the rate table rows.
- (Optional) Select the dimension to use for the rate table columns from the Table columns list.
- To create sections within the rate table, select the desired dimension from the Table separator list. For example, you might want to create sections in the rate table for different project types.
- Enter optional notes about the purpose or use of the rate table in the Note box.
- Click the Rates tab and set up the rates.
Setting up rates involves downloading a Microsoft Excel rates workbook, entering (or copying/pasting) the rates in the workbook, and importing the Excel rates workbook into Cortex. You cannot enter rates directly on the Rates tab.
Important. This procedure replaces all the existing rates for the rate table.
- Click Export to download the Excel rates workbook.
- Enter the rates (as multipliers) into the Excel workbook. For example, to increase by 10%, enter a rate of 110. To decrease by 5%, enter a rate of 95. Entering 100 for the rate is the same as multiplying by 1.
- Save the Excel workbook.
- Click Import and select the Excel workbook to populate the Rates tab.
- If you specified a Table separator for the rate table, you need to perform the export/import procedure for each table section.
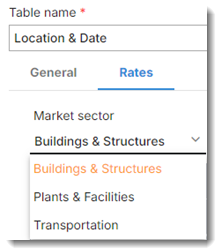
For example, suppose you chose Market sector for the Table separator. On the Rates tab, select the first market sector from the list and perform the export/import procedure. Then select the second market sector from the list, and perform the export/import procedure again. Repeat this for each market sector in the list.
- To check the rate table to make sure every cell contains a rate, click Check above the grid. Cortex notifies you if the rate table is missing any rates. (Missing rates can cause unexpected results when a rate table is applied to a project. Use the export/import process to supply the missing rates and import them to the grid.)
- If you are ready to make the rate table available for use in Cortex, select the Active check circle. Otherwise, clear the Active check circle if you are still developing the table.
- When you finish setting up the rate table, click Save.
Tips
- The order that the rate tables appear in Factors > Rate tables is the order they display in the Apply Factors window. Use drag and drop to place the tables in the desired order.
- Note that only the active rate tables appear in the Apply Factors window. Inactive rate tables are typically still being worked on, so they do not display in the Apply Factors window.
- When you create a new rate table, Cortex adds a project attribute for that table to the project field list in Administration (Fields > Project fields > Fields). This attribute appears in the list of available fields (in the Factors group) for views in Administration that can include project attributes. This gives you the ability to display individual factors as attributes in the Compare projects grid, on the single project page, and in project collections by adding the project attribute for the corresponding rate table to the applicable view in Administration.
Edit a rate table
- In the Administration module, click Factors > Rate tables in the options list.
- Select the rate table you want to edit.Note that you can view an active rate table, but you cannot edit it and save changes to it. If you need to edit an active rate table, you must first clear the Active check circle.
- Click Edit.
- Modify the rate table as needed. When you finish editing the rate table, click Save & close.
If you get an error message...
Cortex displays an error message when you try to edit a rate table that’s been saved on one or more portfolios, saved searches, or budgets as a factor target because it will impact the saved factor targets. You need to remove it as a target or delete the affected records before you can edit the rate table.
For details about the affected records and factor targets, click the Download list of impacted records link in the error message to download a report to Microsoft Excel.
You can edit the rate tables provided with Cortex 365, but you cannot delete them or add new ones.
Delete a rate table
- In the Administration module, click Factors > Rate tables in the options list.
- Select the rate table you want to delete.
- Click Delete and confirm the deletion of the rate table.
If you get an error message...
Cortex displays an error message when you try to delete a rate table that’s been saved on one or more portfolios, saved searches, or budgets as a factor target because it will impact the saved factor targets. You need to remove it as a target or delete the affected records before you can delete the rate table.
For details about the affected records and factor targets, click the Download list of impacted records link in the error message to download a report to Microsoft Excel.
Mark a rate table as active or inactive
If a rate table is not ready for use because you are still building and refining it, you can mark it inactive so it is not available to users in Cortex. When you finish working on a rate table, you can mark it active to make it available to users.
- Open the Administration module
Click  and select Administration from the menu. The Administration module opens in a new browser tab.
- In the Administration module, click Factors > Rate tables in the options list.
- Select the rate table you want to make available in Cortex Project History, and click Edit.
- Select the Active check circle.
- Click Save and close.
Yes displays in the Active? column for this rate table on the Rate tables page.
In the Administration module, click Factors > Rate tables in the options list.
- Select the rate table you want to make inactive, and click Edit.
- Clear the Active check circle.
- Click Save & close.
No displays in the Active? column for this rate table on the Rate tables page.